All posts by shannah

Steve Hannah is a 28-year-old software developer currently studying and working at Simon Fraser University in beautiful Vancouver British Columbia. He specializes in web information systems and prefers Java, PHP, and Python as programming languages. He is a Christian and worships at Christ Church of China in Vancouver.

New Mobile Theme for Xataface

During my two week “vacation” from Codename One, I’ve been madly working on a new project using Xataface. For this project, I really needed the mobile interface to be smooth, so I decided to finally make Xataface’s core theme responsive. Along the way, I also made numerous improvements to the flow of the UI especially in relation to sorting and filtering results. Before I go into detail about the new features, here are some screenshots of my app, which uses this new mobile theme.

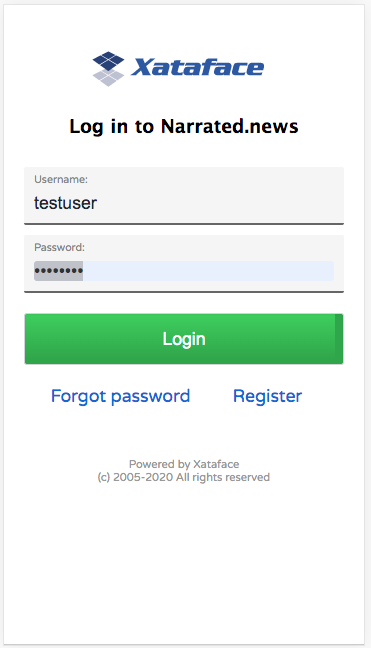
The new login screen is much cleaner and mobile friendly.
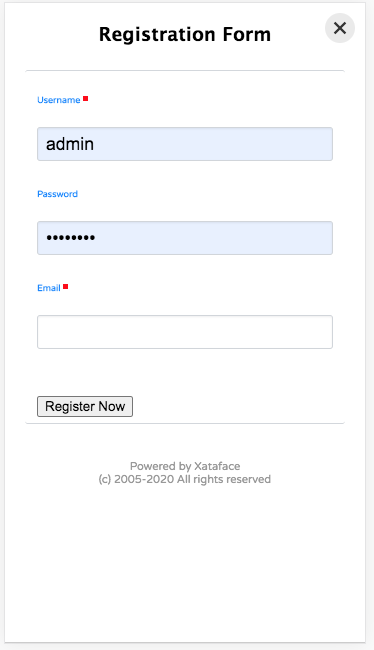
The mobile registration form - fields generated based on the fields in the users table.
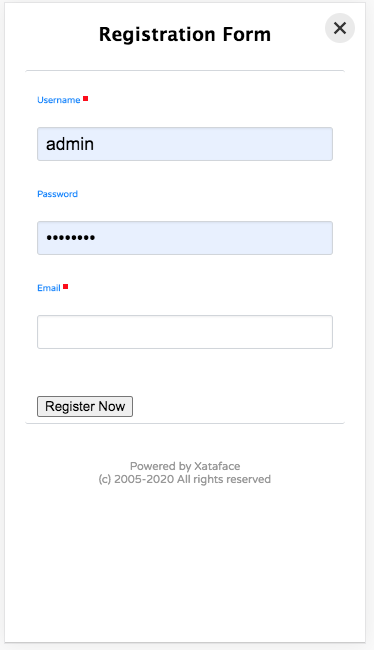
The mobile registration form – fields generated based on the fields in the users table.
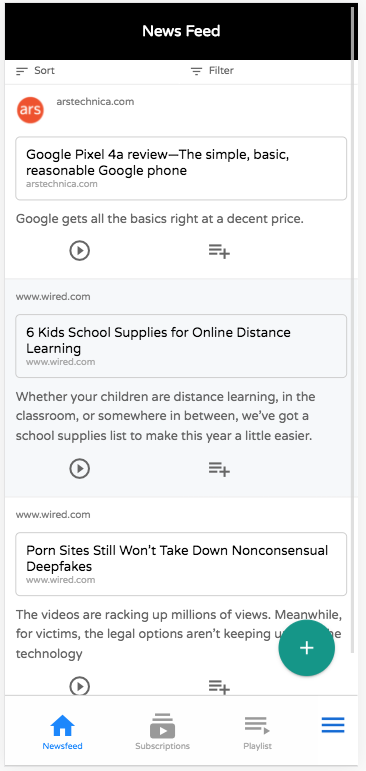
The list view for the "News Feed" table.
The list view for the “News Feed” table.

Screen Shot 2020-08-30 at 7.21.34 AM

Let me unpack that above screenshot of the list view to highlight the various aspects you can see here.

  1. The “tables” menu is rendered along the bottom of the screen as tabs.Table tabs
  2. Sorting and filtering buttons are rendered at the top of the list. Sort and filter buttons When you scroll down the page, these buttons are converted into floating buttons: Floating sort and filter buttons
  3. Notice the Floating Action Button in the lower right for adding new records. Floating Action Button. By default this shows the “New” and “Delete” actions, but you can add your own actions to this menu using the “table_actions_menu” category.
  4. Notice that action icons below each row. These are rendered from the “list_row_actions” category. List row actions

Sorting

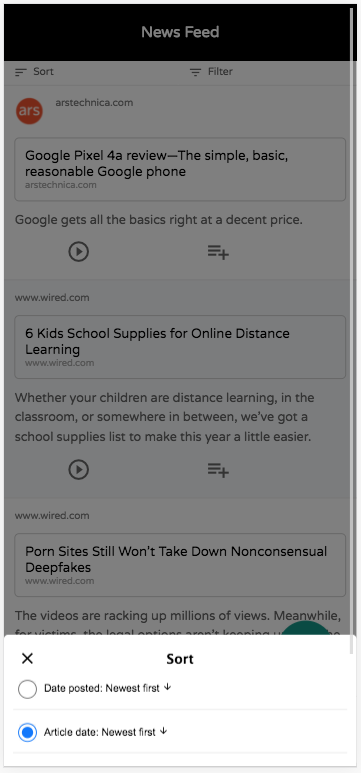
Clicking on the “Sort” button displays a sheet with the various options available for sorting.The sort dialog. You can select which columns should be sortable in the fields.ini file using the new sortable directive.

Filtering

Clicking on the “Filter” button displays a sheet with the various options available for filtering.

Screen Shot 2020-08-30 at 7.40.27 AM

This filter dialog is “live”. The button at the bottom that says “Show 977 Results” will dynamically update as you enter your query so that you can see how many results there will be.

Optional Search Header

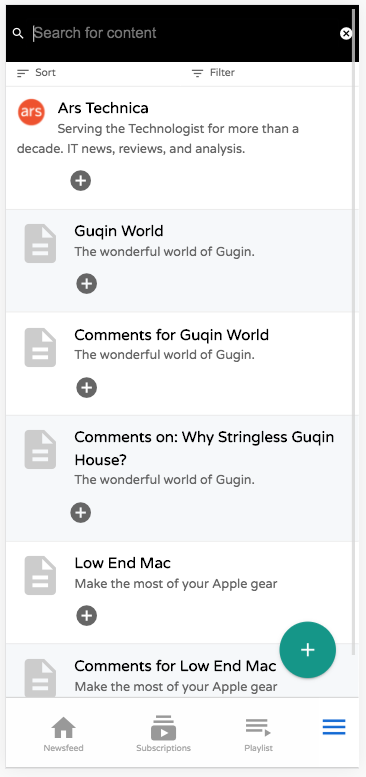
On some tables you may want the header to be a “search” field. This can be achieved using the the new fieilds.inii “search_field_header” directive, as demonstrated in this table:

Search Header

New/Edit Record Forms

Forms are Xataface’s bread and butter, so they need to be very mobile friendly. I’ve completely revamped the stylesheet to be responsive so that forms are a pleasure to use on the smaller displays.

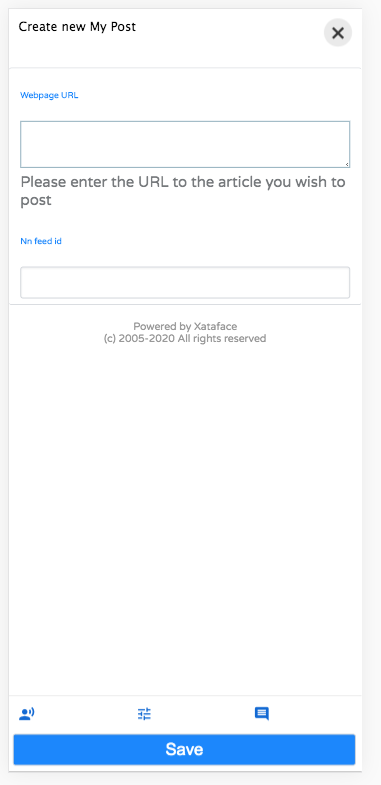
New Record Form

I’ve also added a new feature to help reduce clutter on forms. You can now make field groups “hidden” by default. Hidden field groups are collapsed into buttons that are rendered at the bottom of the form:

Fieldgroups menu

The user can display a hidden field group by clicking on the corresponding icon. E.g. In the example form shown above, the user might want to edit the “narration”. They can do so by clicking on the “Narration” icon at the bottom of the form, which will reveal the narration-related fields.

Narration field group

More to Come

This is just a quick post to share some of the work. There are tons of new features that I didn’t cover here. I’ll be blogging more about them soon.

I’ve been slowly assembling a “definitive” guide for Xataface. You can see the current version (in progress) at https://shannah.github.io/xataface-manual/

After I’ve ported all of the existing documentation into this manual, I’ll be using it as the basis for a new website. There is lots of new stuff in the pipe for Xataface, so stay tuned.

Things I Like #1: The Retroist

For 2019, I’ve decided to start blogging about things I like. For my first entry, I’d like to share “The Retroist Podcast”, and associated media. The Retroist podcast is devoted to pop-culture from the late 70’s to early 90’s mostly. Each episode is about 20 minutes long, and covers a single topic, such as a TV series, a movie, a video game, a fad, or some other relevant bit of culture from yesteryear. The episode archive goes back as far as 2009 and is quite comprehensive. At this point, he’s already covered just about every prominent (and obscure) TV series, movie, and video game from 1980 to 2000.

When I first discovered this series, about 6 months ago, I binged on it, listening the the ones that covered all of my favourite TV shows. I started with the Night Court episode because it was the one that I happened to stumble upon first. The episode was full of interesting facts about the series, but it was the introduction/opening anecdote that made me take notice. He connected Night Court to his own personal memories of the time, sharing anecdotes about how Harry Anderson’s comedic brand of magic sparked his imagination as a child. While it only lasted a few minutes, it briefly transported me back to my childhood when I would sometimes tune into Night Court late at night (when I was watching TV after my bed time). His story-telling style is calm, fluent and descriptive.

I went on to binge on the extensive library of past episodes, listening to all of my favourites. Another “thing I like” is going for walks around town while listening to podcasts, so this podcast fit right in with my schedule.

Every episode follows the same structure. He opens with a short introduction and anecdote with a personal connection to the topic. These are always my favourite parts. He follows this with an “info-packed episode” full of facts and trivia bits. Most of the episode just the Retroist talking, but most episodes include a segment by another contributor (e.g. Vic Sage’s “Also-ran” segment that lists the ‘other’ movies or TV shows that were running at the same time as the episode’s subject), and some even include an interview with someone affiliated with the subject.

I’m fairly well versed in 80’s and 90’s pop culture – especially TV and Movies of that era; but I’m not in the same league as the Retroist. This guy is uniquely qualified to run a podcast like this, as his commitment (particularly to TV) is truly next level. He has a personal library of old TV recordings on VHS, that must take up a room or 5 in his house. His episodes’ commercial breaks are used for airing old toy commercials and the like. In one of his episodes he shares that he once informed his coach that he wouldn’t be able to attend Saturday morning practices because he had to watch Saturday morning cartoons. He also likes to watch edited-for-TV versions of some movies (e.g. Halloween), even preferring them to their theatrical release. I had never heard of this before, but apparently this is a thing.

He typically releases one new episode per month. I’m sure he must be running into some difficulty thinking of topics by now since he’s covered just about everything I can think of already. Browse the archive – it’s all there.

When I was a kid, I used to listen to Jack Cullen’s “Network Replay” late at night on CKNW. It used to play old radio shows from before the TV era. I think it would be really cool if some network would pick up the Retroist and let him host a similar thing with his extensive library – providing some context and background for each movie or TV show that he airs. He really has a knack for painting a dreamy, nostalgic picture of the context surrounding all things retro.

It is worth noting that the Retroist also has a website where he and contributors post stories about 80’s and 90’s pop-culture. It is pretty active, with a new post every few days. He is also on Facebook and Twitter.

JAXB Hell on JDK 9+

JAXB has been removed from JavaSE starting in JDK 9, so we’ve had to make some changes to some of our code to work around this. We have some custom ANT tasks that use JAXB to process some XML. The task it used inside an ANT script using the <taskdef> tag as follows:

<taskdef name="myCustomTask" 
    classname="com.example.tasks.MyCustomTask" 
    classpath="MyCustomTask.jar"/>

Then laster the task us run using syntax like:

<myCustomTask />

If you try to run these ANT tasks on JDK 9 or higher, you just get a big ClassNotFound error when it tries to load the JAXB classes. So the obvious solution is to bundle the JAXB classes into our jar. This, however, only solves part of the problem. This will, indeed, allow the task to load, but when we try to run the task, it says

javax.xml.bind.JAXBException: Implementation of JAXB-API has not been found on module path or classpath.

Which is strange because we have the API (jaxb-api.jar) and implementation (jaxb-impl.jar, jaxb-core.jar, activation.jar) embedded inside our MyCustomTask.jar file, which should be available on the classpath.

After banging my head against this problem for a few hours, I discovered that the problem is the way which JAXB looks for the implementation. It uses the threads classloader for searching for an implementation, rather than the classloader for our task. When running inside an ANT task, this will be the root classpath for Ant, and not the classpath for my custom ant task.

For example, we have some code like:

JAXBContext componentContext = JAXBContext.newInstance(ComponentEntry.class);

This will fail to find the JAXB implementation (unless we included the JAXB jars in Ant’s classpath – which is not portable in our case, because ANT will usually be run inside an IDE like Netbeans).

I ultimately worked around this problem by wrapping all of my JAXB code inside my own spawned thread. E.g.

private String processFileWithJAXB(final File xmlFile, final boolean full) throws JAXBException {
        final JAXBException[] error = new JAXBException[1];
        final String[] result = new String[1];

        Thread t = new Thread(new Runnable() {
            @Override
            public void run() {
                try {
                    result[0] = processFileWithJAXBInternal(xmlFile, full);
                } catch (JAXBException ex) {
                    error[0] = ex;
                }
            }

        });
        ClassLoader cl = getClass().getClassLoader();
        t.setContextClassLoader(getClass().getClassLoader());
        t.start();

        try {
            t.join();
        } catch (InterruptedException ex) {
            Logger.getLogger(MyClass.class.getName()).log(Level.SEVERE, null, ex);
        }
        if (error[0] != null) {
            throw new JAXBException(error[0]);
        }
        return result[0];
    }

In this example, all of my JAXB stuff is inside the processFileWithJAXBInternal() method. The processFileWithJAXB method creates a thread, sets its context classloader to the current classes class loader, and runs it. And magically, it can find my bundled JAXB implementation.

Posting in my blog to help my memory as I’m bound to run into this issue again.

PSA: Prefer to use AdoptOpenJDK’s jdk-11 builds for embedding in Mac Apps

If you are planning to distribute a Java app on Mac, you should avoid using the JDK builds from jdk.java.net as they won’t necessarily work on Mac OS older than 10.13. This is because the libjvm.dylib is build with MACOSX_MIN_VERSION set to 10.13. This doesn’t necessarily cause a problem until you try to run a signed app on Yosemite or older (10.10). Your app just won’t open. Checking the logs you’ll receive an error like:

​Error: dl failure on line 542
Error: failed /Applications/MyApplication.app/Contents/Java/jre//lib/server/libjvm.dylib, because dlopen(/Applications/MyApplication.app/Contents/Java/jre//lib/server/libjvm.dylib, 10): no suitable image found.  Did find:
    /Applications/MyApplication.app/Contents/Java/jre//lib/server/libjvm.dylib: code signature invalid for '/Applications/MyApplication.app/Contents/Java/jre//lib/server/libjvm.dylib'

Now, you might be fine if you’re building the app on 10.10 or older, but not sure. This particular issue is a combination of:

  1. libjvm.dylib set with a min version of 10.13.
  2. codesign on 10.11 and higher automatically signs libs targeting 10.11 and higher with a different signature than is can be understood by gatekeeper pre 10.11.
  3. Gatekeeper barfing when it hits this signature.

So, If you’re building (signing) your app on the latest Mac OS and you want to be able to distribute it to older versions of OS X, you need to make sure that all of your libraries are built with the MACOSX_MIN_VERSION set to 10.10 or lower.

You can verify this using otool. Inside the standard openjdk build on jdk.net, you can go into the Contents/Home/lib directory, and run:

$ otool -l  */libjvm.dylib | grep VERSION -A 5 | grep version
  version 10.13
  version 0.0

(Note: libjvm.dylib is the only problematic one. All the other dylibs are built with 10.8 min version).

However, if you download the build from AdoptOpenJDK, and do the same thing, you’ll find

$ otool -l  */libjvm.dylib | grep VERSION -A 5 | grep version
  version 10.8
  version 0.0

Just another reason to use AdoptOpenJDK for your Java distro.

iTunes DRM Begone!

My storage room is filled with boxes of CD jewel cases with all of the music I purchased before the digital revolution. At a certain point, it just became easier to just buy music digitally. In fact, In many cases I repurchased music digitally because I didn’t want to be bothered digging through boxes to find my CD version. Unfortunately, much of that music was purchased on iTunes, and Apple frequently decides to not let me listen to the music I purchased from them.

Let me illustrate by recounting my Tuesday experience.

It was the first snow of the year, so I decided to do some coding in my front room so I could look out the front window and enjoy the view. One last thing to make the moment perfect: Music.

So I open up iTunes and browse through my library until I find a song. I press “play” on the song, only to be greeted by a login dialog. I enter my apple ID and password and it informs me that I have already authorized 5 out of 5 computers for listening to this song. Well, that’s inconvenient. I have no idea which computers I have authorized, so, after some Google searching, it seems I need to deauthorize all of my computers. I log into my apple account and find the button I need to click to deauthorize all my computers, then I start again.

I return to the song that I want to play, and am greeted with a login dialog again. This time, after typing in my password, it informs me that I have authorized 1 out of 5 computers for this song. And then… nothing happens.

So I click the song again. It again pops up with login dialog, so I enter my username and password again. And…. nothing happens.

Rinse and repeat a few times – each time accompanying the login with louder and more creative profanity. Log out of iTunes. Log in….

Still cannot play this song. For the love of God! This was just supposed to be ambiance, and now it has derailed my day.

I go and try to play the song on my other computer where it used to work.. And, of course, it no longer works because of the deauthorization I initiated a few steps before. But I have now authorized the song on two computers – whatever that means – it obviously doesn’t mean I can play the songs.

Then a small breakthrough. I notice that one of the login dialogs is prompting me to sign in with my old university email address (which I amalgamated into my new email address about 8 years ago). When I logged in with that old address, it required me to again authorize it. But that appears to be under a different accounting system than my new address, because it insisted that the song had been authorized on 5 of 5 computers.

So I follow the same deauthorization procedure with my old address and start again.

I go back to the song and try to play it. I fill in the login dialog (with my old email address), and it informs me that I have authorized one out of 5 computers. And then…. it plays!

Yay! Clearly this is some computer glitch in Apple’s system with respect to my email addresses. The old address was supposed to cease existence when I switched it those many years ago. And it appears to be linked in some ways (e.g. It works with the new password that I set on my new address recently — so the password is linked), but my music authorization doesn’t work.

So problem solved right?

Actually, now, for some reason, I need to log in to play every single song I’ve ever purchased from Apple. One might think I just need to login once, and everything would work. But no, I need to login each time I want to play a song. In many cases I need to use my old email address to play the some. In some cases I need to use my new address, and in another bunch of cases, I still can’t play the song at all.

I’ve spent time with Apple support in the past (years ago), and never really found a solution. Since this is just ambiance, I’m reluctant to waste a day going through those steps again.

All I can do is:

  1. Never purchase another digital product from Apple again. It’s too risky.
  2. Find the CD copy in my storage room, and rip that onto my computer.

One funny thing about this incident, is that when time came to vent to my wife later, it turned out that she had a similar experience that same day where 2 songs had just been “removed” from her library for no apparent reason (songs she had purchased!!). They’re gone. Hmmm

High Sierra, Ruby, RVM, CocoaPods, ipatool, xcodebuild Ughh!!

This is a very terse post to record a problem/solution for Cocoapods on High Sierra.

I have a build process that involves running cocoapods and xcodebuild on the command line. Some time ago, I installed rvm in an attempt to fix a build error. It ended up not fixing the error, but I kept it installed because it seemed like a nice thing to be able to easily switch between ruby versions. However, xcodebuild and its sub-tools are picky about using the system ruby, so before running xcodebuild, I would always have to switch back to the system ruby using rvm use system. This was an inconvenience, but it wasn’t hard to do, so I just endured.

Some time later, I upgraded to High Sierra, which broke my system ruby. Running ruby would give an error like

dyld: Library not loaded: /System/Library/Frameworks/Ruby.framework/Versions/2.0/usr/lib/libruby.2.0.0.dylib
  Referenced from: /usr/local/bin/ruby
  Reason: image not found
Abort trap: 6

This seems to be because High Sierra upgraded its ruby to 2.3.0, but rvm some things still referenced the old 2.0 installation, which had been removed. In trying to resolve this situation I first uninstalled rvm – because I didn’t seem to be helping anything and could possibly be hurting things:

rvm implode

After doing this, I still received the error message above. I then noticed that I had two ruby binaries on my Path: /usr/local/bin/ruby and /usr/bin/ruby. The former referenced the old 2.0 libs, while the latter seemed to correctly reference the new location. So, I deleted the former:

sudo rm /usr/local/bin/ruby

And things almost started working. When I tried installing cocoapods again with:

sudo gem install cocoapods

I received “Permission denied” messages. I needed to do

sudo gem install -n /usr/local/bin cocoapods

And, voila!, things magically start working again.

Use NPM to Distribute Your Command-Line Java Apps

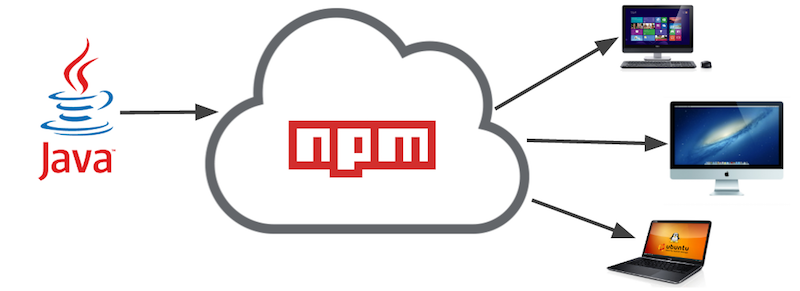
jDeploy flow

From time to time, I need to develop and distribute a command-line application to my customers, and I prefer to write these apps in Java. But I’ve been frustrated by the Java eco-system’s lack of good distribution options for this type of app. I look at tools like Cordova and Ionic that provide a neat “single-line” installation instructions and wonder why I can’t achieve the same thing with Java.

My general solution up until now has been to zip up the executable Jar with its dependencies, and post it for my users to download. The installation instructions then become something like:

  1. Download myapp.zip
  2. Extract it
  3. Then run the app using something like “java -jar /path/to/myapp/myapp.jar”

Sometimes I go as far as writing shell script launch scripts that people can add to their PATH, but this adds an additional installation step…. we were already at 3 possible places for users to get stuck.

Compare this to the installation instructions for Cordova:

  1. Open a command prompt and type “npm install -g cordova”. No need to download anything manually. Just one command
  2. Once installed, you can just run “cordova”, you don’t need to know where it was installed. A symlink is automatically installed in your environment PATH.

That is the type of user experience I want for my command-line apps. Java offers some great package management options for distributing libraries (e.g. Maven and Gradle), but these don’t offer a simple way to distribute applications. Wouldn’t it be nice if we had a way to distribute command-line apps the same way?

NPM to the Rescue

The examples I provided above (Cordova and Ionic) both use NPM as their distribution mechanism. That is what allows them to provide such a smooth process. If you’re not familiar with NPM, it is the package manager that is bundled with NodeJS. Unlike Maven, which is constrained to use in the Java ecosystem (you can only distribute .war, .jar, and pom files), NPM allows you to distribute all manner of files, so why not use it to distribute Java apps. Sounds crazy, I know. But let’s look at some of the features of NPM that make it ideal for distributing Java applications:

  1. WORA – NPM is cross platform, and is automatically installed when users install NodeJS on their system. NodeJS provides a simple double-clickable installer for Mac, Windows, and Linux, so your application can easily be installed on all major platforms.
  2. Pain-free Publishing – Publishing an app to NPM is as simple as npm publish. If you don’t yet have an account on NPM, it’s as simple as npm login. Literally could take you under a minute to get set up and rolling.
  3. Adds to PATH – NPM will automatically add symlinks for your application to the environment path when installed globally. On windows it automatically generates a .cmd script to launch the app. That is the magic that allows apps like Cordova to provide single-line installation instructions.

In addition to all this, NPM provides automatic versioning and updates so that it is easy for you to push updates out to your users. This is a big deal.

But How Do I Deploy my Java App using NPM

You say: This is all fine and well, but how do I leverage NPM to deliver my Java application. NPM is designed to distribute apps written in Javascript, not Java.

I respond: Let me introduce you to jDeploy

jDeploy is a tool that allows you to publish your Java applications on NPM so that users can install it directly using a simple command like

npm install -g your-app

It will take an executable Jar file and bundle it in a node module with all of its dependencies, and publish it to NPM. The resulting app doesn’t even require that the users have Java installed, as it will automatically install a JRE if it detects that Java isn’t installed.

Example

Installing jDeploy

$ npm install -g jdeploy

Publishing an App to NPM

Suppose you have an app in an executable jar file, “myapp.jar”. Place this in a directory on its own, and open a command prompt in this directory, and type:

jdeploy init

This will generate a package.json file for your app that is ready and configured to publish on NPM. You may want to edit this package.json slightly to suit your purposes. The default will look something like:

{
  "bin": {"myapp": "jdeploy-bundle/jdeploy.js"},
  "preferGlobal": true,
  "version": "1.0.1",
  "jdeploy": {"jar": "myapp.jar"},
  "dependencies": {"shelljs": "^0.7.5"},
  "license": "ISC",
  "name": "myapp",
  "files": ["jdeploy-bundle"] 
}

The “myapp” key in the “bin” property is the command name for your app. This is the name of the command that users will run on the command-line to use your app. Change this to something else if you want the command to be different.

The “name” property should be globally unique. This is the identifier that will be used to install your app from NPM. E.g. npm install -g myapp. You may need to change this if the name is already taken by someone else.

Once you’re happy with the settings, you can test out the app locally to make sure it runs.

$ jdeploy install

This should install your command locally so you can try it out:

$ myapp

And your app should run.

Once you’re satisfied that your app works the way you like, you can run

$ jdeploy publish

Installing Your App

Now that your app is published, people can immediately install your app from anywhere in the world, on any computer that runs NPM with a single command:

$ npm install -g myapp

NOTE: On Mac/Linux you will need to use sudo to install the app. Windows should work as long as you are using an administrator account.

Screencast

Introduction to jDeploy Screencast

OCR.net is officially launched

I’m on “vacation” right now from my job at Codename One, so I’m taking some time to work on personal projects for the first time in a while. On the second day of my “personal project” time, I received an email offering me the domain name OCR.net. I was interested in this domain for SEO purposes of PDF OCR X, an app I developed for Mac and Windows for converting scanned PDFs and images into text or searchable PDFs using OCR. Though it cost me a small fortune, I decided to buy the domain.

Now, I could have just redirected this domain to the PDF OCR X website, but I thought it might be cool to create an online version so that OCR.net could function as a self-contained OCR web app. Converting PDF OCR X into a web app took a bit of work. In addition to setting up a public-facing web site, I needed to modify the app so that it would run as a daemon, rather than a “drag-and-drop” desktop app. I built a job dispatching system using Xataface which runs on the OCR.net server itself. The PDF OCR X “daemon” is then run on a Mac server, elsewhere (currently in my basement), but the architecture is such that I can fire up as many “PDF OCR X” boxes as I like and they will request jobs from the central dispatcher as they become available. This way it is easy to scale the service.

Responsive UI

I wanted a clean, modern user interface for the web app. And it needed to look good on mobile as well as desktop. I found this nice design by ajlkn that felt right. It is minimal and clean.

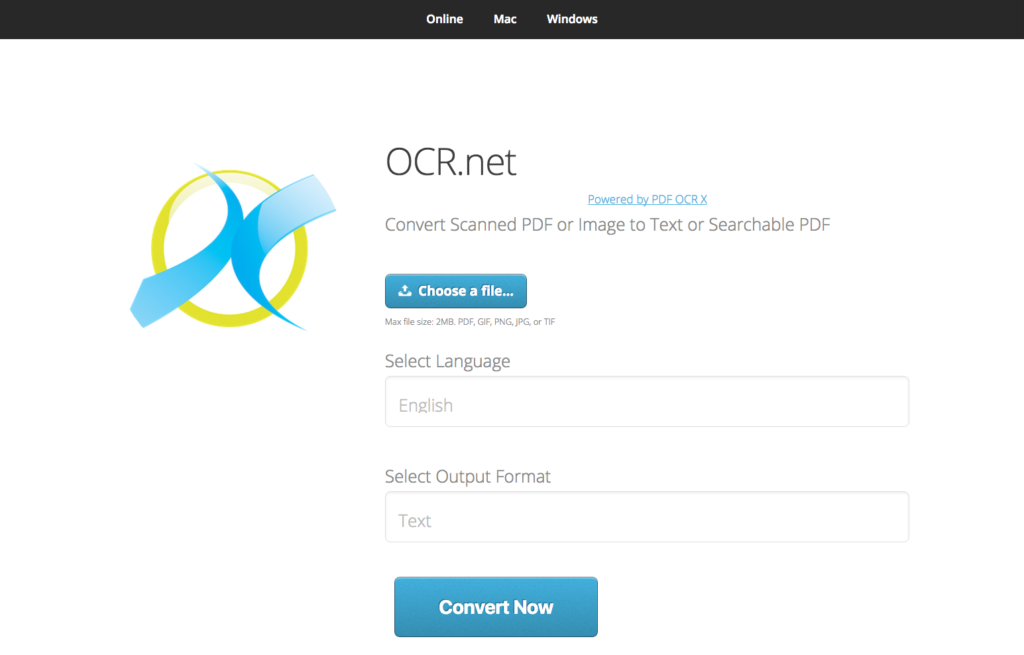
Here is the UI on the desktop:

OCR.net desktop screenshot
]7 OCR.net desktop screenshot

And here is what it looks like on mobile:

OCR.net as seen on a mobile device
]8 OCR.net as seen on a mobile device

As a Mobile Application

PDF OCR X has always only been a desktop application (Mac or Windows). I hadn’t paid much attention to mobile. However, with this new web-based UI, it is actually quite useful as a mobile app in itself. On my iPhone I tested it out by taking some snapshots of some documents on my desk, and it converted them with pretty good accuracy. Adding OCR.net to my home screen allows me to use it just like a first class iOS application.

Try it out

Try it out. Share it with your friends. Add it to your phone’s home screen. Use it.

And let me know what you think.

Async to Better U/X

I come to you today with three simple tips that will guarantee to improve your Codename One apps’ usability:

  1. Don’t block the EDT
  2. If you must block the EDT, do it when the user won’t notice
  3. Prefer asynchronous coding patterns (e.g. using callbacks) to synchronous coding patterns (e.g. *AndWait(), and *AndBlock() methods).

The first one is GUI 101. All of the UI is drawn on the EDT (Event dispatch thread). If you are performing a slow operation on the EDT, the user will probably notice a lag or a jerk in the UI because drawing can’t take place while your slow operation is occupying the thread.

Here’s a quick example. I have a form that allows the user to swipe through 12 images, which are loaded from the classpath (getResourceAsStream()). My first attempt at this is to load all of the images into Labels inside the Form’s constructor as follows:

public class MyForm extends Form {
    private Tabs tabs;

    public MyForm() {
        super("Welcome to My App");

        tabs = new Tabs();

        tabs.hideTabs();

        setScrollable(false);
        Container buttonsContentWrapper = new Container(new BorderLayout());
        try {
            for (int i=1; i< =12; i++) {
                int w = calculateTheWidth();
                int h = calculateTheHeight();
                Button l = new Button(
                        Image.createImage(
                                Display.getInstance().getResourceAsStream(null, "/Instructions"+fi+".png")
                        ).scaledSmallerRatio(w, h)
                );

                l.setUIID("Label");
                if (i>1) {
                    l.setUIID("InstructionImage");
                }
                l.addActionListener(e->{
                    buttonsContentWrapper.setVisible(!buttonsContentWrapper.isVisible());
                    revalidate();
                });
                Container tabWrapper = FlowLayout.encloseCenter(l);
                tabWrapper.getAllStyles().setPaddingTop(Display.getInstance().convertToPixels(2));
                if (i==12) {
                    tabWrapper.putClientProperty("lastSlide", Boolean.TRUE);
                } else {
                    tabWrapper.putClientProperty("lastSlide", Boolean.FALSE);
                }
                tabs.addTab(i+"", tabWrapper);
            }
        } catch (Exception ex) {
            Log.e(ex);
        }
        Container mainContent = new Container(new BorderLayout());
        mainContent.addComponent(BorderLayout.CENTER, tabs);
        setLayout(new LayeredLayout());
        addComponent(mainContent);

        buttonsContentWrapper.setVisible(false);
        Button skipButton = new Button("Skip");

        skipButton.addActionListener(e->{
            MyApp.getInstance().getMainForm().show();
        });

        Container buttonsContent = FlowLayout.encloseRight(skipButton);
        buttonsContentWrapper.addComponent(BorderLayout.SOUTH, buttonsContent);
        addComponent(buttonsContentWrapper);
    }
}

So what’s the problem with this code? Loading the 12 images inside the constructor of this form takes too long. If I have code like:

MyForm form = new MyForm();
form.show();

There is a lag of 1 or 2 seconds in the new MyForm() line — before the form is even shown. This feels really bad to the user.

We can improve on this by employing the 2nd tip above:

If you must block the EDT (hey we need to load the images sometime right?), then do it when the user won’t notice

Rather than loading all of the images directly inside the MyForm constructor, we can load each one inside its own Display.callSerially() dispatch, as shown below:

public class MyForm extends Form {
    private Tabs tabs;

    public MyForm() {
        //...
        try {
            for (int i=1; i< =12; i++) {
                //...
                final Button l = new Button();
                Display.getInstance().callSerially(()->{
                    try {
                        l.setIcon(
                            Image.createImage(
                                    Display.getInstance().getResourceAsStream(null, "/Instructions"+fi+".png")
                            ).scaledSmallerRatio(fw, fh)
                        );
                        l.getParent().revalidate();
                     } catch (Exception ex){
                        Log.e(ex);
                    }
                });
                //...

            }
        } catch (Exception ex) {
            Log.e(ex);
        }
        //...

    }
}

This will still load the images on the EDT, but it will do them one by one, and in a future event dispatch, so that the code won’t block at all in the constructor. If you run this code, you’ll notice that the 1 to 2 second lag before showing the form is gone. However, the form transition may contain a few “jerks” because it is still interleaving the loading of the images while drawing frames.

So this is an improvement, but still not a good user experience. Luckily we can go back to tip #1, “Don’t block the EDT”, when we realize that we didn’t have to block the EDT at all. We can load the images on a background thread, and then apply them as icons to the labels when they are finished loading, as shown below:

public class MyForm extends Form {
    private Tabs tabs;

    public MyForm() {
        // ...
        try {
            for (int i=1; i< =12; i++) {
                // ...
                final Button l = new Button();
                Display.getInstance().scheduleBackgroundTask(()->{
                    try {
                        Image im = Image.createImage(
                                Display.getInstance().getResourceAsStream(null, "/Instructions"+fi+".png")
                        ).scaledSmallerRatio(fw, fh);
                        if (im != null) {
                            Display.getInstance().callSerially(()->{
                                l.setIcon(im);

                                l.getParent().revalidate();
                            });
                        }
                    } catch (Exception ex){
                        Log.e(ex);
                    }
                });
                //...
            }
        } catch (Exception ex) {
            Log.e(ex);
        }
        //...

    }
}

This has double nesting. The first nest (inside scheduleBackgroundTask()) downloads the icon on a background thread. Then the second nesting using callSerially(), assigns the image as the label’s icon back on the EDT. This was necessary because we can’t access the label from the background thread. That part must occur on the EDT. But that part is non-intensive and very fast to perform.

So the result is a very fluid user experience with no lags and no jerks.

Prefer Async to Sync

I’ll address the preference of Async to Sync separately. The example above is a sort of example of this since the nested calls to scheduleBackgroundTask() and callSerially() are technically “callbacks”. However, with this tip I’m more specifically targeting methods like invokeAndBlock(), addToQueueAndWait(), and other *AndWait() methods. At their core, all of these methods are built upon invokeAndBlock() so I’ll target that one specifically here – and the wisdom gleaned will also apply to all AndWait() methods.

First of all, if you aren’t familiar with invokeAndBlock, it is a marvelous invention that allows you to “block” the EDT without actually blocking the EDT. It will indeed block the current dispatch event, but while it is blocked, it will start processing the rest of the events in the EDT queue. That way your app won’t lock up while your code is blocked. This strategy is used for modal dialogs to great effect. You can effectively show a dialog, and the “next” line of code isn’t executed until the user closes the dialog – but the UI itself doesn’t lock up.

invokeAndBlock() is the infrastructure that allows you to do synchronous network requests on the EDT (e.g. NetworkManager.getInstance().addToQueueAndWait(conn)). Since this pattern is so convenient (it allows you to think serially about your workflow – which is much easier), it is used in all kinds of places where it really shouldn’t be.

So why NOT use invokeAndBlock

Because it will ALMOST always result in a worse user experience. I’ll illustrate that with a scenario that would seem, at first, to be a good case for invokeAndBlock (addToQueueAndWait()).

Here is a form that allows a user to update his bio. Somehow the form needs to be populated with the user’s existing profile data, which is exists on a network server. The question is when and how do we load this data from the server.

A first attempt might populate the data inside the form’s constructor using AddToQueueAndWait() (or some method that encapsulates this). That might look like this:

public class MyForm extends Form {

    public MyForm() {
         ConnectionRequest req = createConnectionRequest();
         NetworkManager.getInstance().addToQueueAndWait(req);
         setupFormComponents();
         populateFormData();
    }
}

The problem with this is similar to our first example loading images from the classpath. Execution will stall inside the constructor for our form while the data is loaded. So the user will have to wait to show the form. A common technique to mitigate this UX blunder is to display an infinite progress indicator so the user knows that something is happening. That’s better, but it still makes the app feel slow.

If we want the user to be able to see the form immediately, then either we need to have loaded the data before-hand, or we need to show the form, and populate it later. We could also use a combination (e.g. show the form with data we loaded before, then update it once we have the new data.

Loading data before hand, exclusively, is not realistic. There must exist a point after which we deem the data is too old and we need to reload it. And we are back at needing to load data when the form loads.

If we want to solve this problem, and still use addToQueueAndWait(), we either need to wrap addToQueueAndWait() inside a callSerially() dispatch so that it doesn’t block inside the constructor – and delay our show() method; or we need to move the call somewhere else, after the form is already shown. Although that isn’t ideal either, because we’d like to have the data as soon as possible – so the longer we delay the “sending” of the network request, the longer the user has to wait for the result.

Now, our handy tool (invokeAndBlock) that was supposed to reduce our app’s complexity, is actually making it more complex. Wrapping it inside callSerially() in the constructor means that we are now combining an async callback with sync blocking code. We might as well, at that point, just use addToQueue(), and use a result listener to process the response without blocking the EDT at all, as shown in the example below:

public class MyForm extends Form {

    public MyForm() {
         ConnectionRequest req = createConnectionRequest();
         req.addResponseListener(e->{
             populateFormDataWithResponse(req);
         });
         NetworkManager.getInstance().addToQueue(req);
         setupFormComponents();
    }
}

This predicament is the reason not to use invokeAndBlock (addtoQueueAndWait()). It isn’t that they are evil, or they can’t be made to work. It is because, if you aim to achieve an optimal user experience, it will get in the way more than it will help.

Does this mean that you should never use invokeAndBlock() or addToQueueAndWait()? No. There are valid cases for both of these. E.g. addToQueueAndWait() can be used from a background thread (off the EDT), in which case it isn’t even using invokeAndBlock. It is just plain-old blocking that background thread, which is perfectly OK because it’s not the EDT. In addition, there may be cases where you DO want to block the flow of the application without locking up the UI. Modal dialogs is the flag-ship use-case for this. I struggle to think of another suitable scenario though.

Entitled OSS Users and the Xamarin RoboVM acquisition

RoboVM has been acquired by Xamarin, it was announced; and it would no longer be open source.

Wow.

It only took five minutes for the forum posts and reddit threads to start up condemning the move as some sort of robbery. The RoboVM was accused of luring unsuspecting users into its community on the promise of open source, only to pull a switcheroo and sell out to big business. Some users were demanding the RoboVM team continue to share their work for free, because … that would only be fair.

RoboVM, on the other hand, explained that they had been open source for a few years and had received little to no contributions from the community, so there wasn’t much incentive to continue with that approach. My personal experience with managing open source projects is consistent with theirs. I released the first version of Xataface in 2005. In that time it has hundreds of thousands of downloads, and is still used in many enterprises as the back-bone of their web information systems (I don’t have an exact count since most apps built with Xataface are internal). In that time, I can count the number of community contributions on my fingers and toes. I’m thankful to all of the users who did contribute. But let’s be real, the case for open sourcing a project because the community will contribute is not compelling.

Shut up and Fork it!

No, really. The source (albeit a couple of months out of date) is still on GitHub and it is licensed under the GPL. That repository represents countless hours of high-quality work by incredibly skilled individuals. That is one hell of a contribution to the open source community. Let them move on; And if you want your open source RoboVM, you can build on this fantastic source base.

Personally, I think it is highly likely that the last open source version of RoboVM will continue to circulate for a long time to come. At least in its core as an AOT java VM, it should be maintainable by people on the outside because most of the heavy lifting is already done there. It is the value-added components like the iOS API bindings, and tool support, that will be difficult for the community to maintain going forward. These things are evolving too fast for volunteers to keep up with.

Dependent Tools

If you are an iOS developer who just uses RoboVM to build iOS apps in Java, then the move to close the source probably won’t affect you – except that your costs may be going up some. I wonder more about the impact that this has on other developer tools that have made RoboVM an integral part of their tool chain. I’m thinking about companies like Gluon that provides JavaFX support for iOS and Android. They use RoboVM for their iOS builds. DukeScript, which allows you to write Java apps with an HTML5 UI and deploy to iOS (and other platforms), also uses RoboVM for its iOS builds. How will they respond.

I had argued as recently as 6 months ago that we (at Codename One) should incorporate RoboVM into our toolchain rather than maintain our own Java VM. But we ultimately decided that there was too much risk in that approach because “what if RoboVM closes down, or goes closed source”. 20/20 hindsight shows that we made the right choice and our new iOS VM is now quite mature, performant, and robust. But most importantly we are not dependent upon other external factors for maintaining it.

What Open Source VMs are Left for iOS?

RoboVM wasn’t the only open source VM for iOS. It was just the most active, and provided the best and most comprehensive bindings to the iOS native APIs. But there are alternative VMs that the open source community may turn to for their supply chain. For example:

  1. Codename One (proper) – (Full disclosure, I work for Codename One)… Codename One is open source and provides a full cross-platform Java solution for write once run anywhere.
  2. Codename One’s VM – Codename One has developed its own Java VM for iOS that works as a cross-compiler from Java to C. This is open source and is a good option for Java tools that need a path to iOS.
  3. Avian – Avian is an AOT Java compiler that can be used to compile java directly to iOS binaries. It is written in C++, and has a very permissive license.
  4. XMLVM. This project has been discontinued. But I mention it for completeness in case people want to revive it.
  5. OpenJDK for iOS. It has been approved for an iOS port of the Open JDK to be developed. This may also present a long-term option, but this is still only in the planning stage.
  6. J2ObjC – A transpiler that converts Java source code into Objective-C source code.
  7. JUniversal – Java source transpiler to C# and C++ that includes a runtime library to help with portability.